TeamSwift

Home of the Suzuki mini-compacts ! Your Home for all things Suzuki Swift, Geo Metro, Holden Barina, Chevy Sprint, Pontiac Firefly, and Suzuki Cultus. TeamSwift is a technical performance oriented community!
It is currently Fri Nov 24, 2017 11:04 am

Underbody braces, turbos and more!

All times are UTC - 5 hours


Post new topic Reply to topic  [ 11 posts ] 
Author Message
PostPosted: Sun Aug 02, 2009 7:51 pm 
Offline
User avatar

Joined: Tue Oct 24, 2006 3:09 pm
Posts: 4998
Location: Palm Springs: Too hot from June to Oct.!
In 2004, Godzuka had a problem with his rear shock replacement.
You can read about it here:
viewtopic.php?f=10&t=5559
Every "cheap/used" car that I've bought in the past 10 years has needed the shocks replaced.
This is one of the most overlooked parts of a car, and one of the most satisfying things you can do to improve it. Additionally, a car which 'porpoises' over bumps is unsafe. This will put an end to that and make it less likely your air bag will be needed. Don't know what I mean? Watch an old Buick next time it goes over an uneven surface.

Here's how you "do it yourself" on the rear:

This example is a 93 Metro Convertible, if your undercarriage looks the same, the technique will apply.

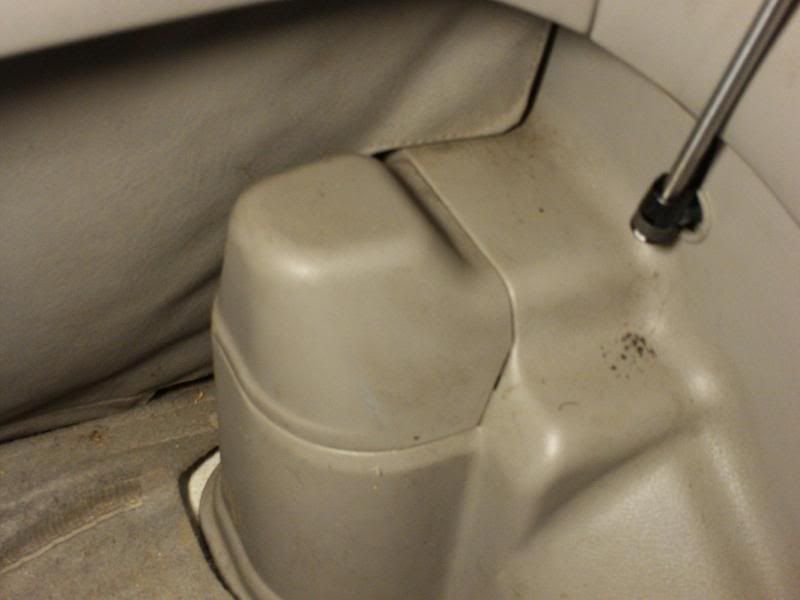
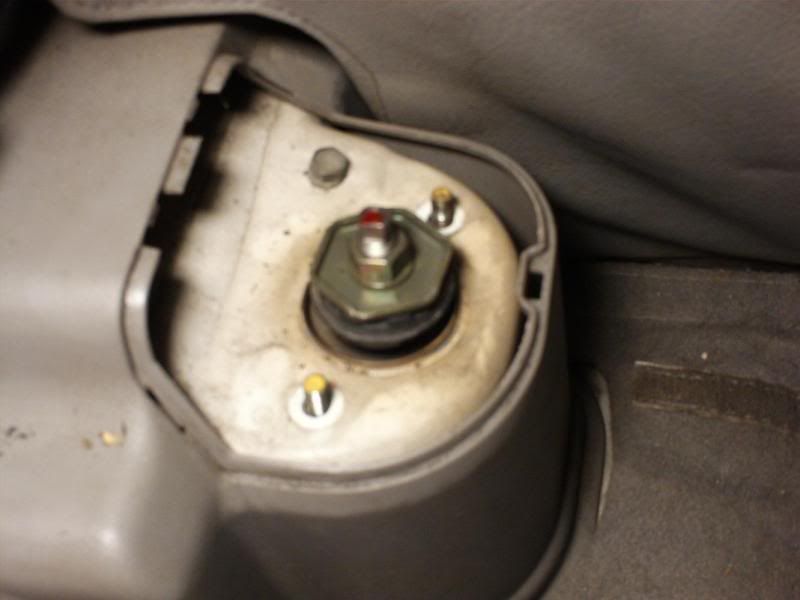
In the trunk you will find this:
Image
You remove the plastic cap to get this:
Image
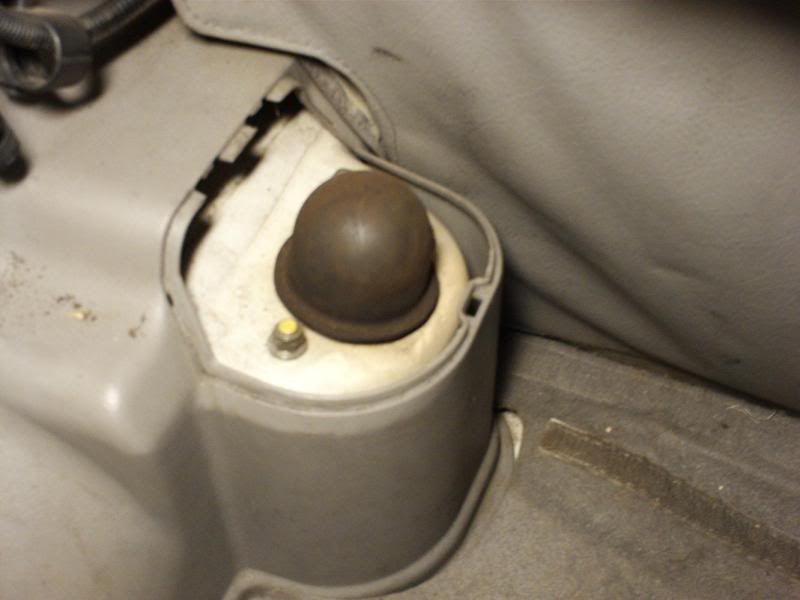
Then you remove the rubber cap to make it look like this:
Image
Oh no, complications!
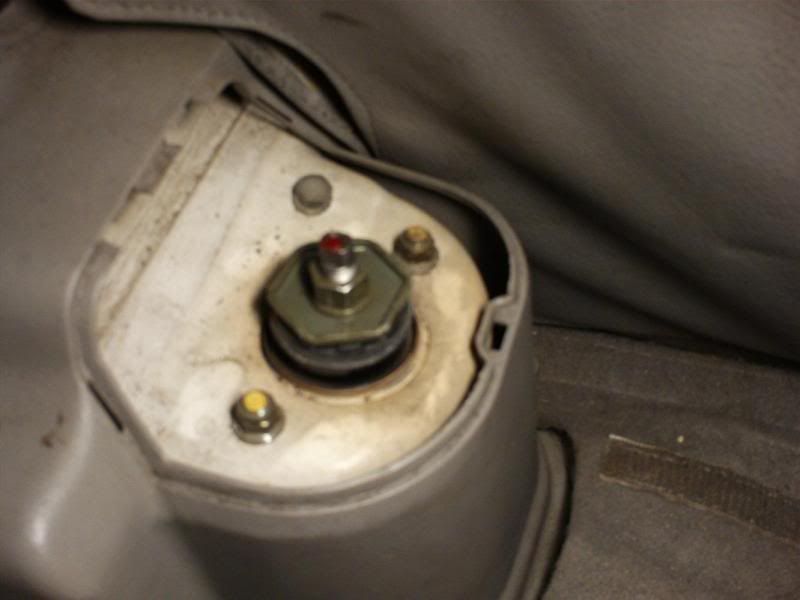
No worry. Go and get a #12 MM wrench and put it on like this:
Image
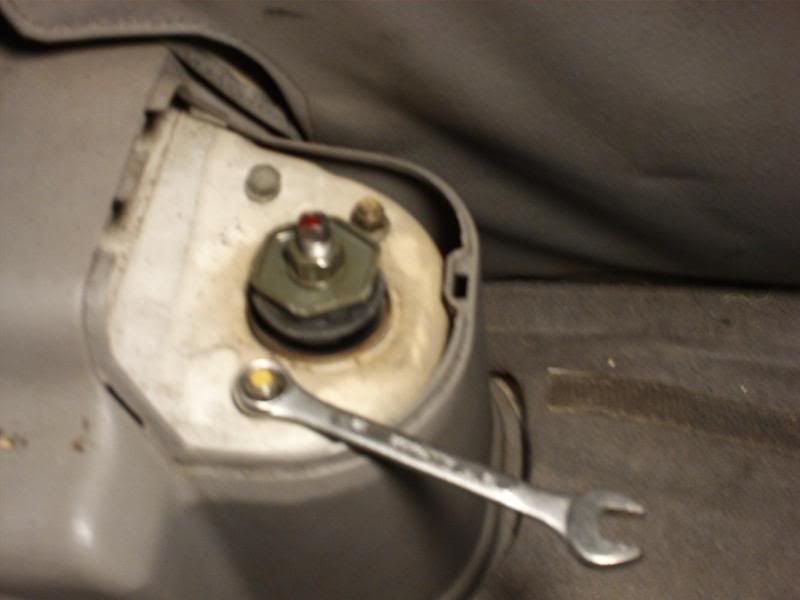
So far, so good. Now remove the two 'nuts'.
It will end up looking like this:
Image
Are you still with me?
You are DONE on the top.
Now it's time to travel to the underside of your car.

Jack it up:
Image
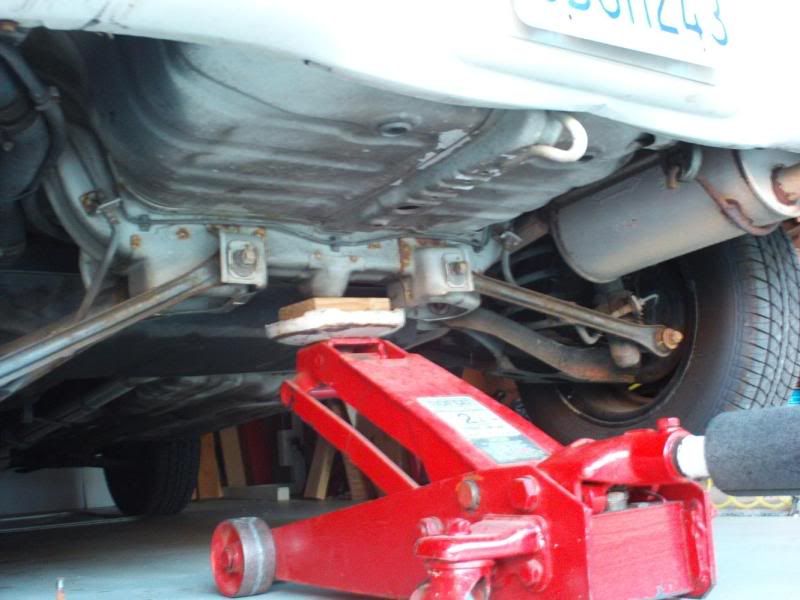
You can use another style jack, but lifting it in the center seems easy.
It probably isn't necessary to put some 'jack stands' under the car if you're careful, but that'll be your decision, not mine.
Next, check out your 'undercarriage' for rust:
Image
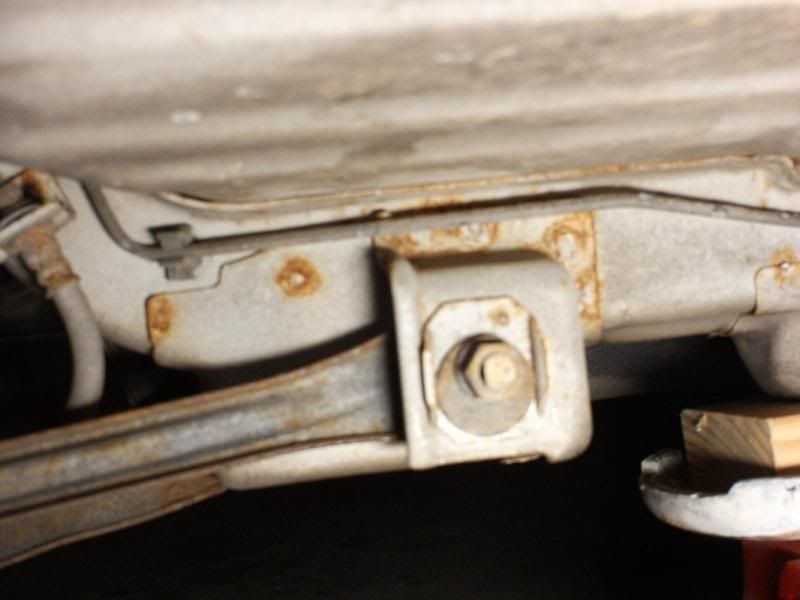
and find the lower part of the shock absorber:
Image
Ole Godzuka called this a 'sandwich bolt', but we'll call it a 'pinch bolt' for now.
Can you see it? It's a bit rusty, but not too bad. Get out your trusty 14 MM wrench:
Image
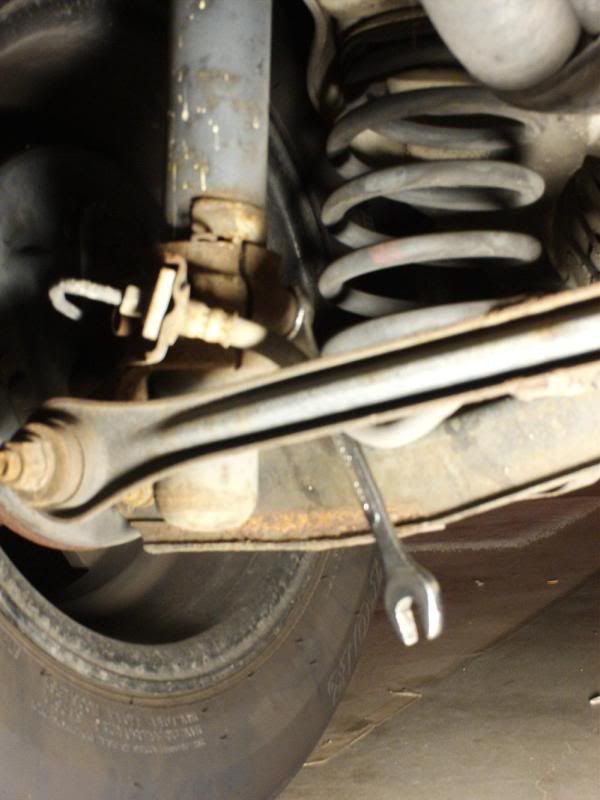
and use the box end (not the open end) to loosen that thing.
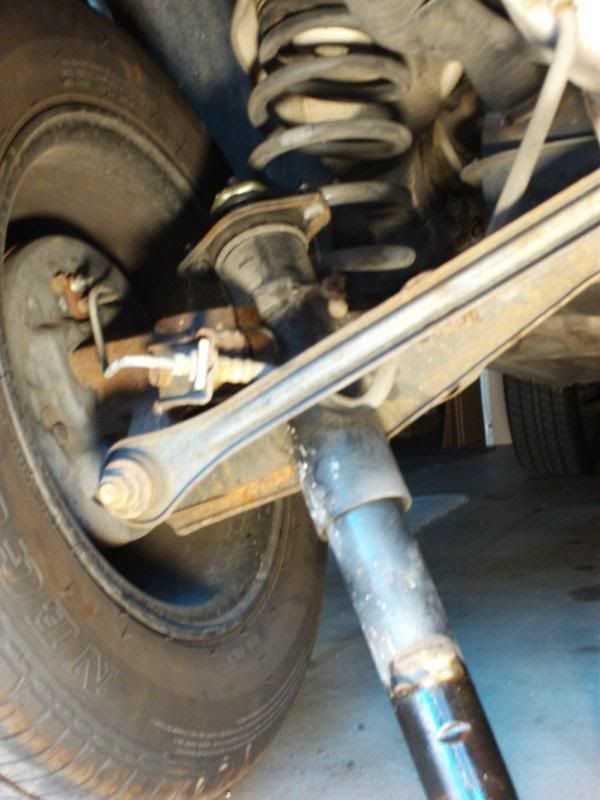
You can also use a socket but take the bolt all the way out.
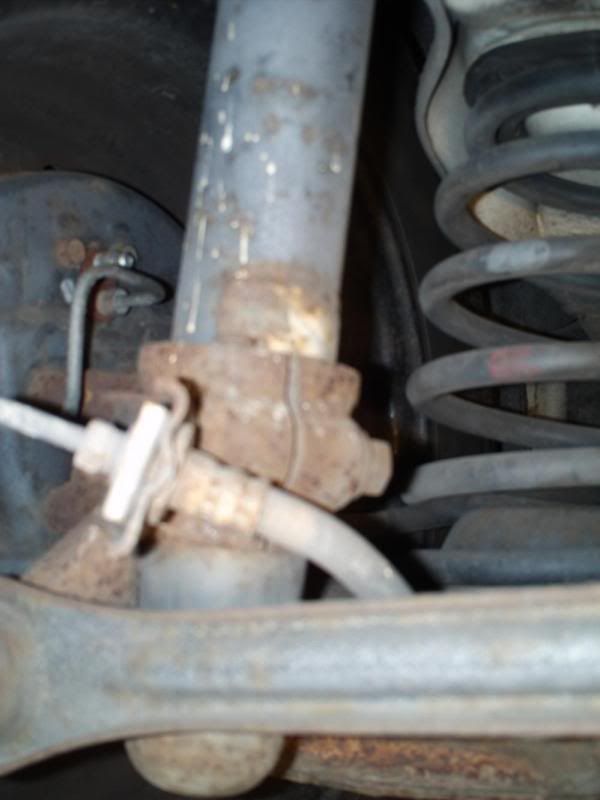
Now would be a good time to hit that lower end with a little spray oil if you have some.
Once the bolt is out, you might have to 'spread' the pinch joint using a large screwdriver, or a chisel driven up parallel with that old shock.
Also, you can put a block of wood under the old shock and lower the car a bit to get that old shock to slip up and out of the lower pinch joint.
Now that the shock is out of the lower joint, ease it down:
Image
and out.
This will reveal the lower shock pinch joint in all it's glory:
Image
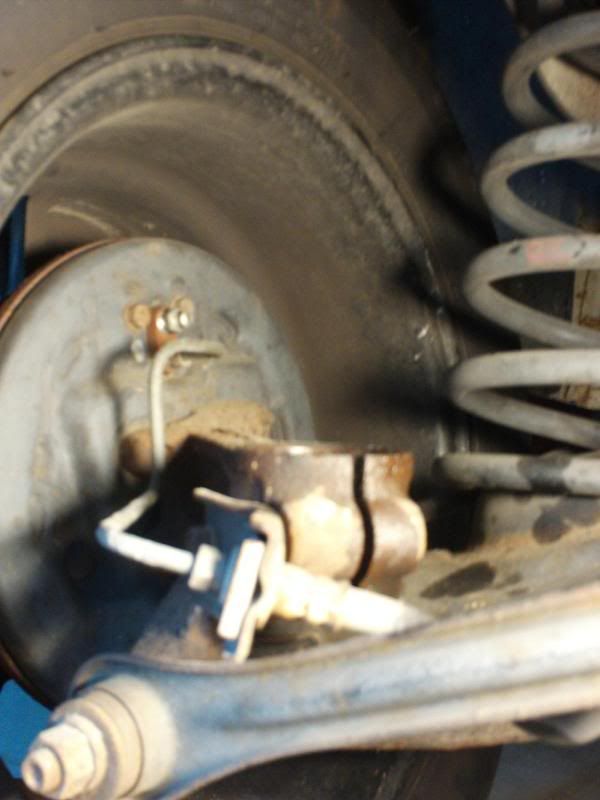
That little piece can be a real pain in the a*s, so take a few minutes to clean up the inside and lightly lube it.
Then, when you put the new shock back in, it won't be so difficult.
Next we have the old shock next to the newly ordered shock:
Image
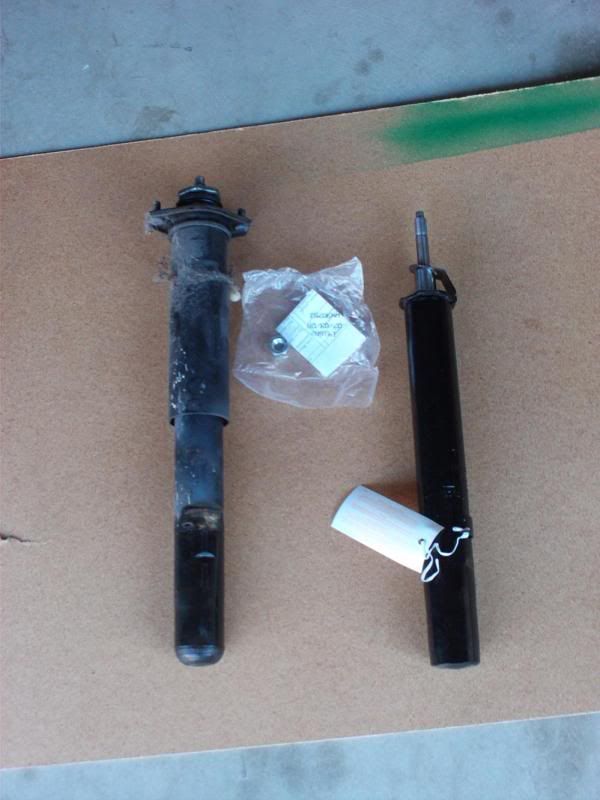
And they seem to be a match, so we can continue.
The top part of the shock must be removed:
Image
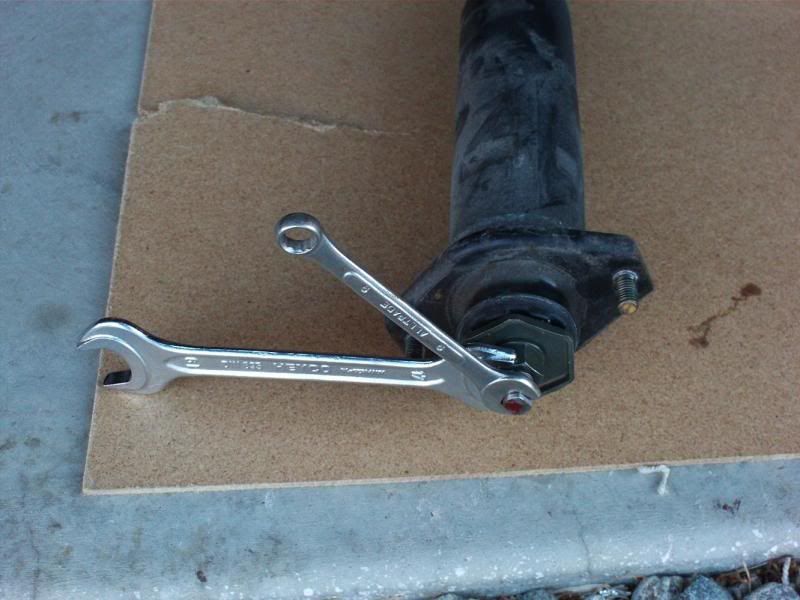
This rig shows a stock set up. The little wrench is an 8 MM and the large one is a 17 MM.
You must hold the shaft with the 8 MM and loosen the 17 MM.
If you don't have an 8MM, you can use a vise grip. Actually, the vise grip works better.
Some people try this:
Image
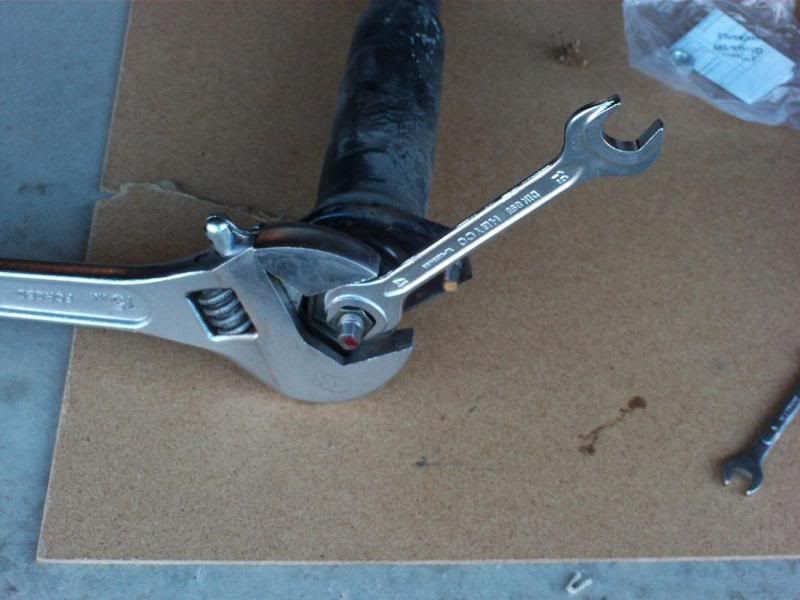
which looks great, but is a waste of time. The center shaft can spin, so you won't be able to get it apart.
Once you get the bolt off, you can lay the parts between the new and old shock:
Image
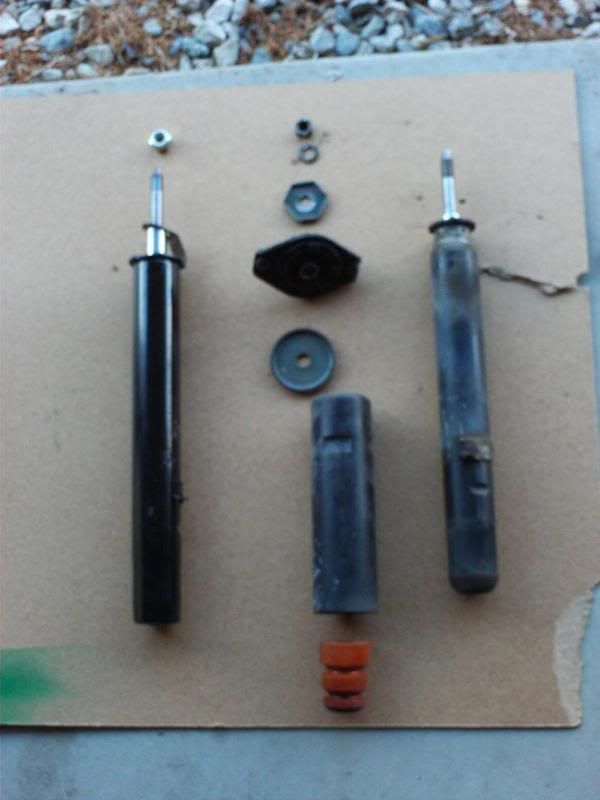
so that you don't get confused.
Now, transfer the parts to the new shock and tighten up the bolt on the top as in the step above.
In this case, I kept the old bolt, and held the shaft tip with a vise grip when it came time to do the final tightening.
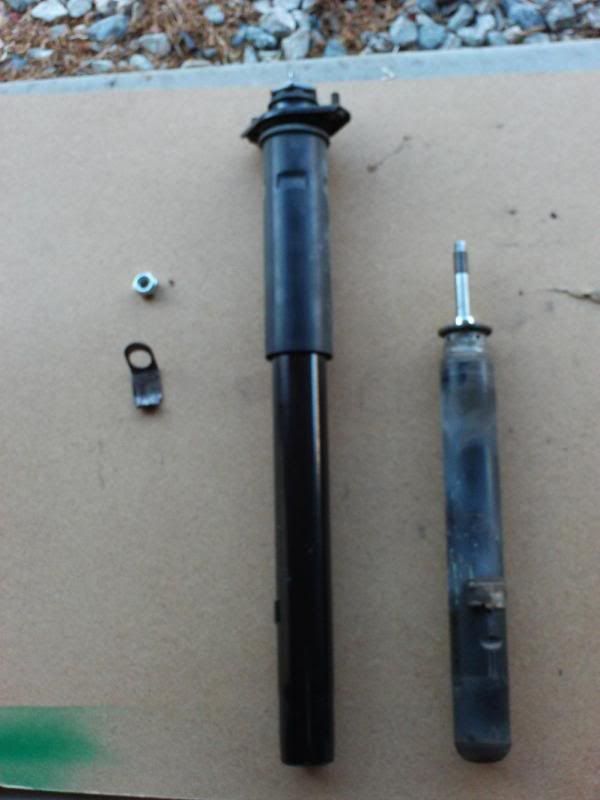
Here you can see the results:
Image
The two pieces on the left will not be used.
This shock is ready to be slid up into the car.
The most difficult part, sliding the lower part of the shock into the pinch joint at the bottom, can be facilitated with some spray oil and spreading that joint a bit. You must be patient; some go in easily, others ...are a 'bear'.
If the going gets real rough, you can carefully grab the very bottom of the shock with a large vise grip and wiggle it down into it's home.
When you finally get the shock all the way back down, the 'dent' in the lower shock will match up so the pinch bolt can slide in and be tightened.
Once that's done, you're back to this step:
Image
If those top two bolts aren't lined up, don't panic! They can be rotated into place by hand.

That's it.

So many people have said, "I don't know ANYTHING about cars, I just put gas in, and that's it."
I've got to wonder how difficult the above R&R (remove and replace) is for the ordinary Joe.
Considering the labor is often equal to the price of the replacement parts, this job may cost the 'ignorant' customer over $200.
I hope you will attempt to change your rear shocks using this DIY.
That way, the next time I go to buy a used car, I won't have to!

_________________
DIY Broken Bolt Removal: viewtopic.php?f=22&t=41042
DIY Clutch Adjustment: viewtopic.php?f=9&t=48281
DIY Wheel Bearings: viewtopic.php?f=2&t=29003
DIY Shocks: viewtopic.php?f=10&t=45483
DIY Wheel Align: viewtopic.php?f=2&t=42479
Once you get the cars dialed-in (compression, leaks, bearings, alignment, brakes) swap in new rubber and glass, you've got something which should last for years!


Top
 Profile  
 
PostPosted: Wed Jun 23, 2010 10:32 pm 
Offline

Joined: Wed Jul 15, 2009 11:37 pm
Posts: 263
Location: Anytown, USA
I know its been forever since this was posted, but this just helped me do my own tonite, they were kind of a b!tch to get apart, 40 min or so, but about 8 min to put them back in and bolt up and WOW, totally feels different and no more BANG / THUMP when I hit a bump.

_________________
2001 Swift 4/5, 3.52 trans, AC, Power Steering, 16580r13s
1993 Mitsubishi Galant 2.0 16 valve auto
1990 Mitsubishi Eclipse GS 2nd Gen 2.4 DOHC 4G64 10.5:1 pistons, 2.25 catback, 160CHP


Top
 Profile  
 
PostPosted: Thu Jun 24, 2010 6:28 am 
Offline

Joined: Sat Mar 20, 2010 12:44 am
Posts: 35
Location: Kelowna
I agree great post! Is this stickyed somewhere?

_________________
1987 Turbo Sprint


Top
 Profile  
 
PostPosted: Thu Jun 24, 2010 9:43 am 
Offline

Joined: Wed Jul 15, 2009 11:37 pm
Posts: 263
Location: Anytown, USA
Thats a good question! Now Im wondering if I should replace the front ones too! I know I want to put power steering in cause my manual rack is CRAP and clunks like crazy.

_________________
2001 Swift 4/5, 3.52 trans, AC, Power Steering, 16580r13s
1993 Mitsubishi Galant 2.0 16 valve auto
1990 Mitsubishi Eclipse GS 2nd Gen 2.4 DOHC 4G64 10.5:1 pistons, 2.25 catback, 160CHP


Top
 Profile  
 
PostPosted: Sat Jun 26, 2010 7:50 pm 
Offline
Moderator & FAQ King
User avatar

Joined: Wed Apr 09, 2003 6:22 pm
Posts: 6460
Location: Vancouver, BC
Stickied until I can make a proper index for this section! :mrgreen:

_________________
jaguar,vettes&sprints wrote:
...can you inlighten me about lihtan's
( miracle pour hole)
maybe a picture Thanks


Top
 Profile  
 
PostPosted: Mon Jun 28, 2010 7:04 am 
Offline

Joined: Wed Jul 15, 2009 11:37 pm
Posts: 263
Location: Anytown, USA
I have a pair on the way for the front. Im sure after 135k miles they need it. I got a pair of gabriels off Ebay for 66.95 shipped. The rehabber I just got will most likely be getting a new set too.

_________________
2001 Swift 4/5, 3.52 trans, AC, Power Steering, 16580r13s
1993 Mitsubishi Galant 2.0 16 valve auto
1990 Mitsubishi Eclipse GS 2nd Gen 2.4 DOHC 4G64 10.5:1 pistons, 2.25 catback, 160CHP


Top
 Profile  
 
PostPosted: Wed Oct 06, 2010 11:15 am 
Offline
User avatar

Joined: Wed Oct 06, 2010 10:52 am
Posts: 2
Location: Calgary, Alberta, Canada
Awesome info post! I plan on doing this as soon as I get some money for new shocks for the front and back. I was wondering if there is a picture walk through on how to do the front struts. I heard you can only do those with air tools.

My friend told me I should also change the rear bearings so I can fix my rear toe. Any info on that would be great too

I'm still new to the DIY world, so please try dumb down some of the common sense stuff for me :D

Oh, and I have a 5-speed 3-cyl '91 firefly non-turbo if that matters 8)


Top
 Profile  
 
PostPosted: Wed Nov 03, 2010 8:35 am 
Offline
User avatar

Joined: Tue Jul 20, 2004 7:17 pm
Posts: 3566
Location: Georgetown, Guyana
There probably is - and you can change the front struts without airtools, you will need a coil spring compressor though.

oh - rear bearings and rear toe are not related.

_________________
'93 1.3 Swift GLX
'98 2.0 Grand Vitara


Top
 Profile  
 
PostPosted: Wed Nov 03, 2010 8:55 pm 
Offline
User avatar

Joined: Tue Oct 24, 2006 3:09 pm
Posts: 4998
Location: Palm Springs: Too hot from June to Oct.!
Here's a variation on an old theme:
We (ssgti/89 and I) swapped in some H & R Lowering Springs into a 1989 GTi today.
Here's the difference between the new and old front springs:

Image

The shorter length of the front springs meant you won't need to compress the springs to get the assemblies together.

Hope this helps!

_________________
DIY Broken Bolt Removal: viewtopic.php?f=22&t=41042
DIY Clutch Adjustment: viewtopic.php?f=9&t=48281
DIY Wheel Bearings: viewtopic.php?f=2&t=29003
DIY Shocks: viewtopic.php?f=10&t=45483
DIY Wheel Align: viewtopic.php?f=2&t=42479
Once you get the cars dialed-in (compression, leaks, bearings, alignment, brakes) swap in new rubber and glass, you've got something which should last for years!


Top
 Profile  
 
PostPosted: Thu Nov 04, 2010 8:52 am 
Offline
User avatar

Joined: Wed Oct 06, 2010 10:52 am
Posts: 2
Location: Calgary, Alberta, Canada
I managed to scrounge up enough money to change all 4 shocks with Monroe (cant remember specifics) shocks. Once I got acquainted with my new friend Mr. Breaker Bar, the job became INFINITELY easier. I wouldn't bother trying to do this DIY without that thing. I wasted a whole day trying to hit a wrench with a hammer to try and undo that goddamn mother *beep* piece of *beep* *beep* pinch bolt.

The only thing which I want to make a note of for all the newbie DIY, like myself, if you do this job undo the top nuts AFTER the pinch bolt, or have something under the assembly to catch it. I nearly soiled myself when the whole thing just dropped, making some awful loud noise in the process. :cry:


Top
 Profile  
 
PostPosted: Thu Nov 04, 2010 5:10 pm 
Offline
Suzuki Elder
User avatar

Joined: Mon Dec 01, 2003 12:47 pm
Posts: 11675
Location: columbus, ohio
phil, you old sea dog. :lol:

this is a really good tutorial. now, over a year old, it ought to be a "stickie."

your commentary with pictures are made to order for visual learners. someone who has never picked up a wrench should be able to replace their struts and springs armed with this information.

you're a good man, charlie brown. :wink:

_________________
1991 Blue Geo Metro Convertible highly modified 1.0L Turbo3 5 spd. - 1991 Red Geo Metro Convertible customized with a Twincam 5 spd.

My Turbo3 Project
My Cardomain Page -Ol' Blue
My YouTube Channel
My Photo Gallery
SAAB Sonett II


Top
 Profile  
 
Display posts from previous:  Sort by  
Post new topic Reply to topic  [ 11 posts ] 

All times are UTC - 5 hours


Who is online

Users browsing this forum: No registered users and 1 guest


You cannot post new topics in this forum
You cannot reply to topics in this forum
You cannot edit your posts in this forum
You cannot delete your posts in this forum
You cannot post attachments in this forum

Search for:
Jump to:  
Powered by phpBB® Forum Software © phpBB Group