Here is a simple 'poor man's' way to statically balance your rotating assemblies.
First, you clean your old pistons and rods. Then you put the new rings, bearings, caps, nuts and bolts on finger tight. Oh, how did I clean those pistons? Warm 'Simple Green', a toothbrush...and a few hours.
I used a
triple beam balance similar to those found in science classes:

These can be found from various sources. I got mine from here:

but you can get yours anywhere you like. I got mine from those people because of their positive feedback online regarding the styrofoam packaging/storage box; it's a sensitive balance, and packaging is important for safe shipping, plus she stores handily and safely between engine rebuilds.
Originally, to see if it would work, I 'borrowed' one from the science lab

ssssssssssssshhhhhhhhhhhhhhhhhh!!! but returned it. That was many years ago.
Next, you find a clean work place and put the assemblies and the balance in one place. Remember, this balance can be thrown off by a drop of oil, so you have to have clean hands, blah blah blah....
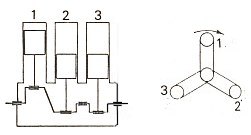
Here we are balancing a three cylinder:

The picture above was taken before the rings were installed. Sorry!

You put the rings on too!!!

With everything ready to go, you do the hard part: getting the rod to stand up on it's own. Trust me, it takes practice.

There is a 500 gram counterweight on the right side of the balance, so you will add that amount to your readings...
Above, you can see that the rod is standing tall. Any wind will mess up your readings. Measure all three assemblies individually, and write down the readings.
I'm thinking the one above is around 710.09 g.
Here's a quick review:

There's a total of 711.24 g (roughly) involved. 500 of the 711.24 can be accounted for by the hanging weight. If you have problems here, consult your neighbor, or a science teacher.
Now we get to the fun part. You've weighed the heaviest and lightest and you subtract to see how much you have to take off the heaviest. In my case, the heaviest weighed about 2.3 grams more than the lightest.
I wondered how much metal I would have to remove, and a small coin (here...a U.S. dime) weighing that amount shows how much I ground off the cap...evenly. Here it is:

The last step involves taking the heavier 'assemblies' and matching them to the lighter ones.
Just so you can see what was removed, I put a little picture of what I did:

For fun, I got it close to the correct weight using the sides, and just ground out the letters at the end for fine tuning.
This static balance is very easy to do, requires a lot less money than a professional job, and produces very satisfactory results, judging from the Teamswift member's reaction who helped me with this particular engine. Further, he felt quite able to balance his next engine using the above technique. It is not as good as an expensive professional dynamic balancing job, but is quite respectable and 'price-wise' is within reach of most guys who can afford a good torque or impact wrench. All my engines get this additional treatment, and I've had no problems because of it. It's more
preparation than actual
grinding.
The first engine that I used this technique (A 1951 Chevrolet 235 6 cylinder) idled so smoothly that I won several bets regarding it's ability to allow a coin(nickel) to stand on edge. (Great way to win free beer

) It is still running. So now you know my 'secret'.
Finally, I've edited this post to reduce the size of the pictures. The large pictures are in my gallery with additional comments.
Happy balancing